

𝗠𝗮𝘀𝘁𝗲𝗿𝗶𝗻𝗴 𝗦𝘆𝘀𝘁𝗲𝗺 𝗣𝗿𝗼𝘁𝗲𝗰𝘁𝗶𝗼𝗻: 𝗥𝗲𝘀𝘁𝗼𝗿𝗲 𝗣𝗼𝗶𝗻𝘁𝘀 𝘁𝗼 𝘁𝗵𝗲 𝗥𝗲𝘀𝗰𝘂𝗲! 🚀
Ever found yourself in a situation where your computer was acting up and you wished you could turn back time? Well, Windows has a magical feature that lets you do just that—**System Protection** with Restore Points! Let’s dive into how you can set this up and why it’s a lifesaver, but also why you might need to disable it temporarily during a malware removal process.
–What Are Restore Points?
Restore Points are snapshots of your system’s state at a particular moment in time. Think of them as time capsules that allow you to revert your system back to a previous, healthier state. This can be incredibly handy if a recent change—like a software installation or a settings tweak—causes issues.
–Setting Up Restore Points
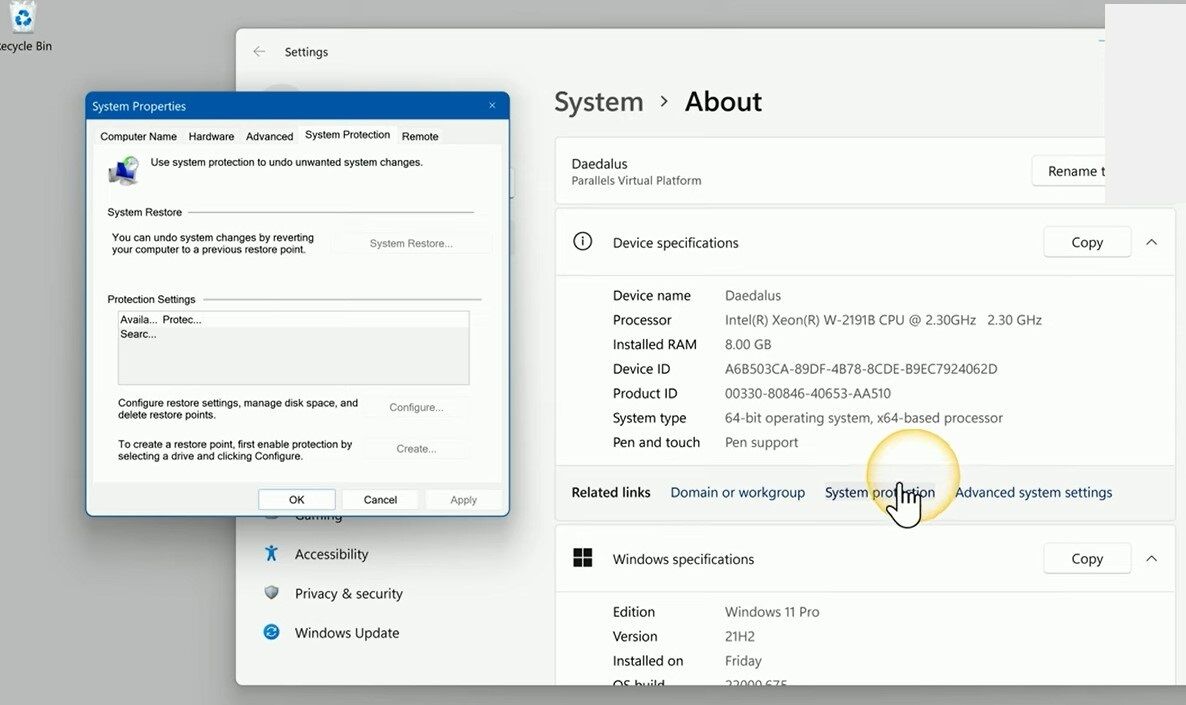
1. **Access System Protection**:
– Head to the **Control Panel**, then **Settings**.
– Navigate to **System** and click on **System Protection**.
2. **Configure Restore Settings**:
– Once in the System Properties window, go to the **System Protection** tab.
– Select the drive you want to protect (usually the C: drive) and click on **Configure**.
3. **Enable System Protection**:
– Choose the **Turn on system protection** option.
– Adjust the **Max Usage** slider to allocate disk space for restore points. Typically, around 5-10% of your disk space should suffice.
– Hit **Apply** and then **OK**.
4. **Create a Restore Point**:
– Back in the System Properties window, click on **Create**.
– Give your restore point a name (e.g., “Pre-Update Backup”) and click **Create** again. Voilà! You’ve created a restore point.
-When to Disable System Protection
While restore points are fantastic for general troubleshooting, there’s a crucial exception: **malware removal**. If your system gets infected, malware can hide in restore points. So, during a malware removal process, it’s essential to disable System Protection temporarily to ensure a clean slate.
–How to Disable System Protection:
1. **Open System Protection Settings**:
– Follow the same steps to reach the System Protection tab.
2. **Turn Off Protection**:
– Select the drive and click on **Configure**.
– Choose **Disable system protection**.
– Click **Apply** and then **OK**.
3. **Delete Restore Points**:
– This ensures no hidden malware remains. Select **Delete** in the Configure window, then confirm.
#### Re-enable After Cleanup
–Conclusion
System Protection with restore points is a powerful feature in Windows, offering a safety net for when things go wrong. Remember to keep it enabled for routine safety but disable it during malware removal to ensure a thorough cleanup. Stay safe and happy computing! 🚀
Explore more tech tips on my blog at matteocasiraghimc.wordpress.com
#WindowsTips #SystemRestore #CyberSecurity

Leave a comment