
How to Share Resources in Windows: Folders, Printers and Drives
Sharing resources in a Windows network environment can
streamline collaboration and improve access to necessary files and devices.
Here, we’ll walk you through the steps to share a folder or printer, and how to
map a network drive using administrative tools, including how to hide a folder using a dollar sign.
Sharing a Folder or Printer
Using File Explorer
1. Open File Explorer: Navigate to the folder you want to share.
2. Right-click the Folder: Select “Properties” from the context menu.
3. Go to the Sharing Tab: Click on the “Share” button.
4. Choose People to Share With: Use the dropdown menu to select the users or groups
you want to share the folder with. You can add their names or email
addresses.
5. Set Permissions: Choose the level of access you want to grant (e.g., read or read/write).
6. Click Share: Finish the process by clicking the “Share” button.
To share a printer:
1. Open Settings: Go to “Devices” and then “Printers & scanners.”
2. Select the Printer: Click on the printer you want to share and select “Manage.”
3. Choose Printer Properties: In the properties window, go to the “Sharing” tab.
4. Enable Sharing: Check the box that says “Share this printer.“
5. Set a Share Name: Assign a name for the shared printer that will be visible on the network.
6. Click Apply: Confirm the changes.
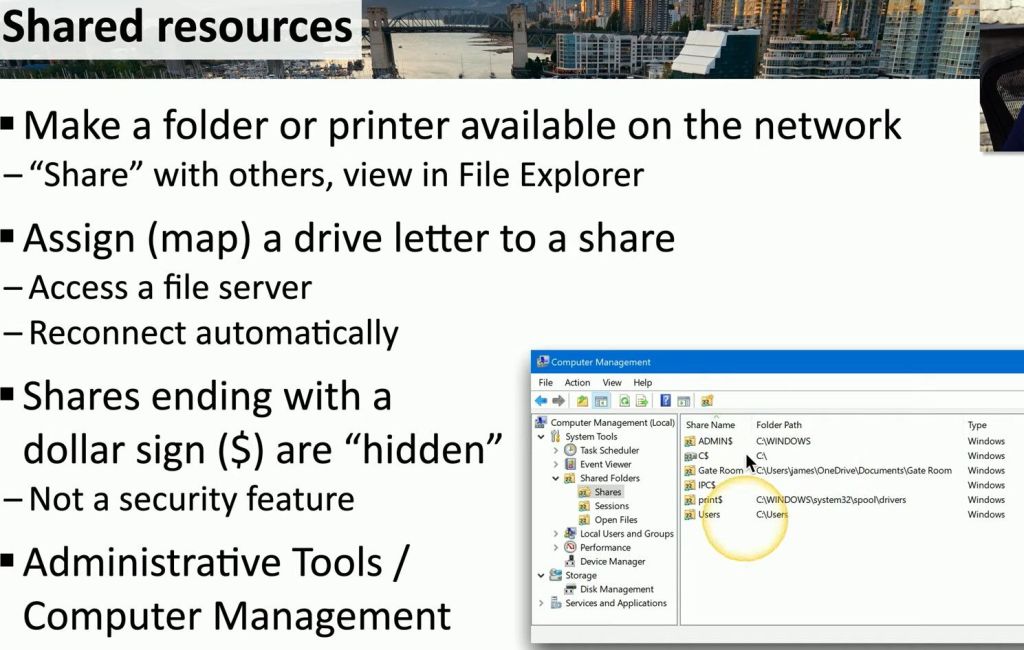
Using Administrative Tools
For more advanced sharing options, you can use the
Administrative Tools:
1. Open Control Panel: Navigate to “Administrative Tools.“
2. Select Computer Management: Open the “Computer Management” window.
3. Navigate to Shared Folders: In the left panel, expand “System Tools” and then “Shared
Folders.”
4. Create a New Share: Right-click on “Shares” and select “New Share.”
Mapping a Network Drive
Mapping a network drive allows you to assign a drive
letter to a shared folder on a server, making it accessible as if it were a
local drive.
1. Open File Explorer: Right-click on “This PC” or “Computer” in the left
panel.
2. Select “Map Network Drive”: This option opens the mapping wizard.
3. Choose a Drive Letter: Select an available drive letter from the dropdown list.
4. Specify the Folder Path: Enter the path to the shared folder in the format \\servername\foldername. For example, to map a shared folder named
“SharedDocs” on a server named “Server1”, you would enter \\Server1\SharedDocs.
5. Reconnect at Sign-in: Check the box if you want the drive to reconnect each time you log in.
6. Enter Network Credentials: If prompted, enter the username and password for access to the shared
folder.
7. Finish the Setup: Click “Finish” to complete the mapping process.
Hiding a Folder
To hide a folder from users who browse the network:
- Use UNC Path with Dollar Sign: When specifying the path to the shared resource, add a dollar sign ($) after the folder name. For example, to share a folder named “SharedDocs” on a server named “Server1” as a hidden share, you would enter
\\Server1\SharedDocs$. - Set Folder Properties: Right-click the folder, select “Properties,” and go to the “Sharing” tab.
- Create a New Share: Follow the usual steps to create a new share using the hidden share path.
Adding the dollar sign ($) creates a hidden share,
meaning it won’t be visible when users browse the network, but it will still be
accessible if they know the exact path.
By following these steps, you can effectively share
folders, printers, and map network drives within your network, enhancing
accessibility and collaboration. Mapping a network drive simplifies accessing
shared resources by integrating them directly into your local file system, and
using hidden shares adds an extra layer of discretion.

Leave a comment